An extensive step by step reverse engineering analysis of a Linux CTF binary
...or in other words, when failing to reverse a CTF binary makes you loose a job

...or, in other words, when failing to reverse a CTF binary makes you lose that job.
During a past job interview, I was tasked to reverse four linux binaries of increasing difficulties as proof of my ability into the reverse engineering field. I solved the first two in a matter of an hour, the third one required me an entire day of work but sadly, I was not able to solve the last one. I don't know if I wasn't selected because of this fail, but it proved me one sure thing: I wasn't prepared enough or, at least, as much as I wanted. Flash forward, I successfully ended up with another job, but that challenge kept staying there, like a small needle, in my head. During the following months, I studied and practiced a lot, mainly into firmware reversing field and, every now and then, I've tried to solve that sneaky challenge.
This is my extensive and detailed description of my fails and success.
Important note
Please note that as this analysis started some months ago and this post was reviewed a huge number of times, you won't find same memory addresses or function names across the screenshots and code snippets.
Running the binary
With what are we dealing?
root@kali:/opt/ctf# file original
original: ELF 32-bit LSB pie executable, Intel 80386, version 1 (SYSV), dynamically linked, interpreter /lib/ld-linux.so.2, for GNU/Linux 3.2.0, BuildID[sha1]=d0d5b9a34a4fe4c52a3939c75bd71cfa0dc23825, stripped
root@kali:/opt/ctf# checksec -f ./original
RELRO           STACK CANARY      NX            PIE             RPATH      RUNPATH	Symbols		FORTIFY	Fortified	Fortifiable  FILE
Partial RELRO   No canary found   NX enabled    PIE enabled     No RPATH   No RUNPATH   No Symbols       No	0		2	./original
A standard, stripped, Linux 32bit binary with no fancy protection active. We're not aiming to exploit it but only to find the flag. A picture is worth a thousand words, they say:
root@kali:/opt/ctf# ./original
[-] No vm please ;)
root@kali:/opt/ctf# ./original AAAA
[-] No vm please ;)
root@kali:/opt/ctf# ./original -h
[-] No vm please ;)
root@kali:/opt/ctf# ./original AAAAAAAAAAAAAAAAAAAAAAAAAAAAAAAAAAAAAAAAAAAAAAAAAAAAAAAAAAAAAAAAAAAAAAAAAAAAAAAAAAAAAAAAAAAAAAAAAAAAAAAAAAAAAAAAAAAAAAAAAAAAAA
[-] No vm please ;)
root@kali:/opt/ctf#
It doesn't run inside a virtual machine and I definitely don't want to build a physical linux box. Would you tell me some of your internals, please?
root@kali:/opt/ctf# strace ./original
execve("./original", ["./original"], 0x7fff2a7dc4f0 /* 48 vars */) = 0
strace: [ Process PID=121645 runs in 32 bit mode. ]
brk(NULL)                               = 0x572fb000
access("/etc/ld.so.nohwcap", F_OK)      = -1 ENOENT (No such file or directory)
mmap2(NULL, 8192, PROT_READ|PROT_WRITE, MAP_PRIVATE|MAP_ANONYMOUS, -1, 0) = 0xf7f05000
access("/etc/ld.so.preload", R_OK)      = -1 ENOENT (No such file or directory)
openat(AT_FDCWD, "/etc/ld.so.cache", O_RDONLY|O_LARGEFILE|O_CLOEXEC) = 3
fstat64(3, {st_mode=S_IFREG|0644, st_size=133840, ...}) = 0
mmap2(NULL, 133840, PROT_READ, MAP_PRIVATE, 3, 0) = 0xf7ee4000
close(3)                                = 0
access("/etc/ld.so.nohwcap", F_OK)      = -1 ENOENT (No such file or directory)
openat(AT_FDCWD, "/lib/i386-linux-gnu/libc.so.6", O_RDONLY|O_LARGEFILE|O_CLOEXEC) = 3
read(3, "\177ELF\1\1\1\3\0\0\0\0\0\0\0\0\3\0\3\0\1\0\0\0\300\254\1\0004\0\0\0"..., 512) = 512
fstat64(3, {st_mode=S_IFREG|0755, st_size=1947056, ...}) = 0
mmap2(NULL, 1955712, PROT_READ, MAP_PRIVATE|MAP_DENYWRITE, 3, 0) = 0xf7d06000
mprotect(0xf7d1f000, 1830912, PROT_NONE) = 0
mmap2(0xf7d1f000, 1368064, PROT_READ|PROT_EXEC, MAP_PRIVATE|MAP_FIXED|MAP_DENYWRITE, 3, 0x19000) = 0xf7d1f000
mmap2(0xf7e6d000, 458752, PROT_READ, MAP_PRIVATE|MAP_FIXED|MAP_DENYWRITE, 3, 0x167000) = 0xf7e6d000
mmap2(0xf7ede000, 12288, PROT_READ|PROT_WRITE, MAP_PRIVATE|MAP_FIXED|MAP_DENYWRITE, 3, 0x1d7000) = 0xf7ede000
mmap2(0xf7ee1000, 10112, PROT_READ|PROT_WRITE, MAP_PRIVATE|MAP_FIXED|MAP_ANONYMOUS, -1, 0) = 0xf7ee1000
close(3)                                = 0
set_thread_area({entry_number=-1, base_addr=0xf7f060c0, limit=0x0fffff, seg_32bit=1, contents=0, read_exec_only=0, limit_in_pages=1, seg_not_present=0, useable=1}) = 0 (entry_number=12)
mprotect(0xf7ede000, 8192, PROT_READ)   = 0
mprotect(0x565b8000, 4096, PROT_READ)   = 0
mprotect(0xf7f34000, 4096, PROT_READ)   = 0
munmap(0xf7ee4000, 133840)              = 0
clone(child_stack=NULL, flags=CLONE_CHILD_CLEARTID|CLONE_CHILD_SETTID|SIGCHLD, child_tidptr=0xf7f06128) = 121646
waitpid(121646, [{WIFEXITED(s) && WEXITSTATUS(s) == 1}], 0) = 121646
--- SIGCHLD {si_signo=SIGCHLD, si_code=CLD_EXITED, si_pid=121646, si_uid=0, si_status=1, si_utime=0, si_stime=0} ---
fstat64(1, {st_mode=S_IFCHR|0620, st_rdev=makedev(0x88, 0x1), ...}) = 0
brk(NULL)                               = 0x572fb000
brk(0x5731c000)                         = 0x5731c000
brk(0x5731d000)                         = 0x5731d000
write(1, "**[-] You fool, nobody debugs me!!**"..., 34[-] You fool, nobody debugs me!!!
) = 34
write(1, "1\n", 21
)                      = 2
exit_group(-1)                          = ?
+++ exited with 255 +++
"You fool, nobody debugs me!!!"
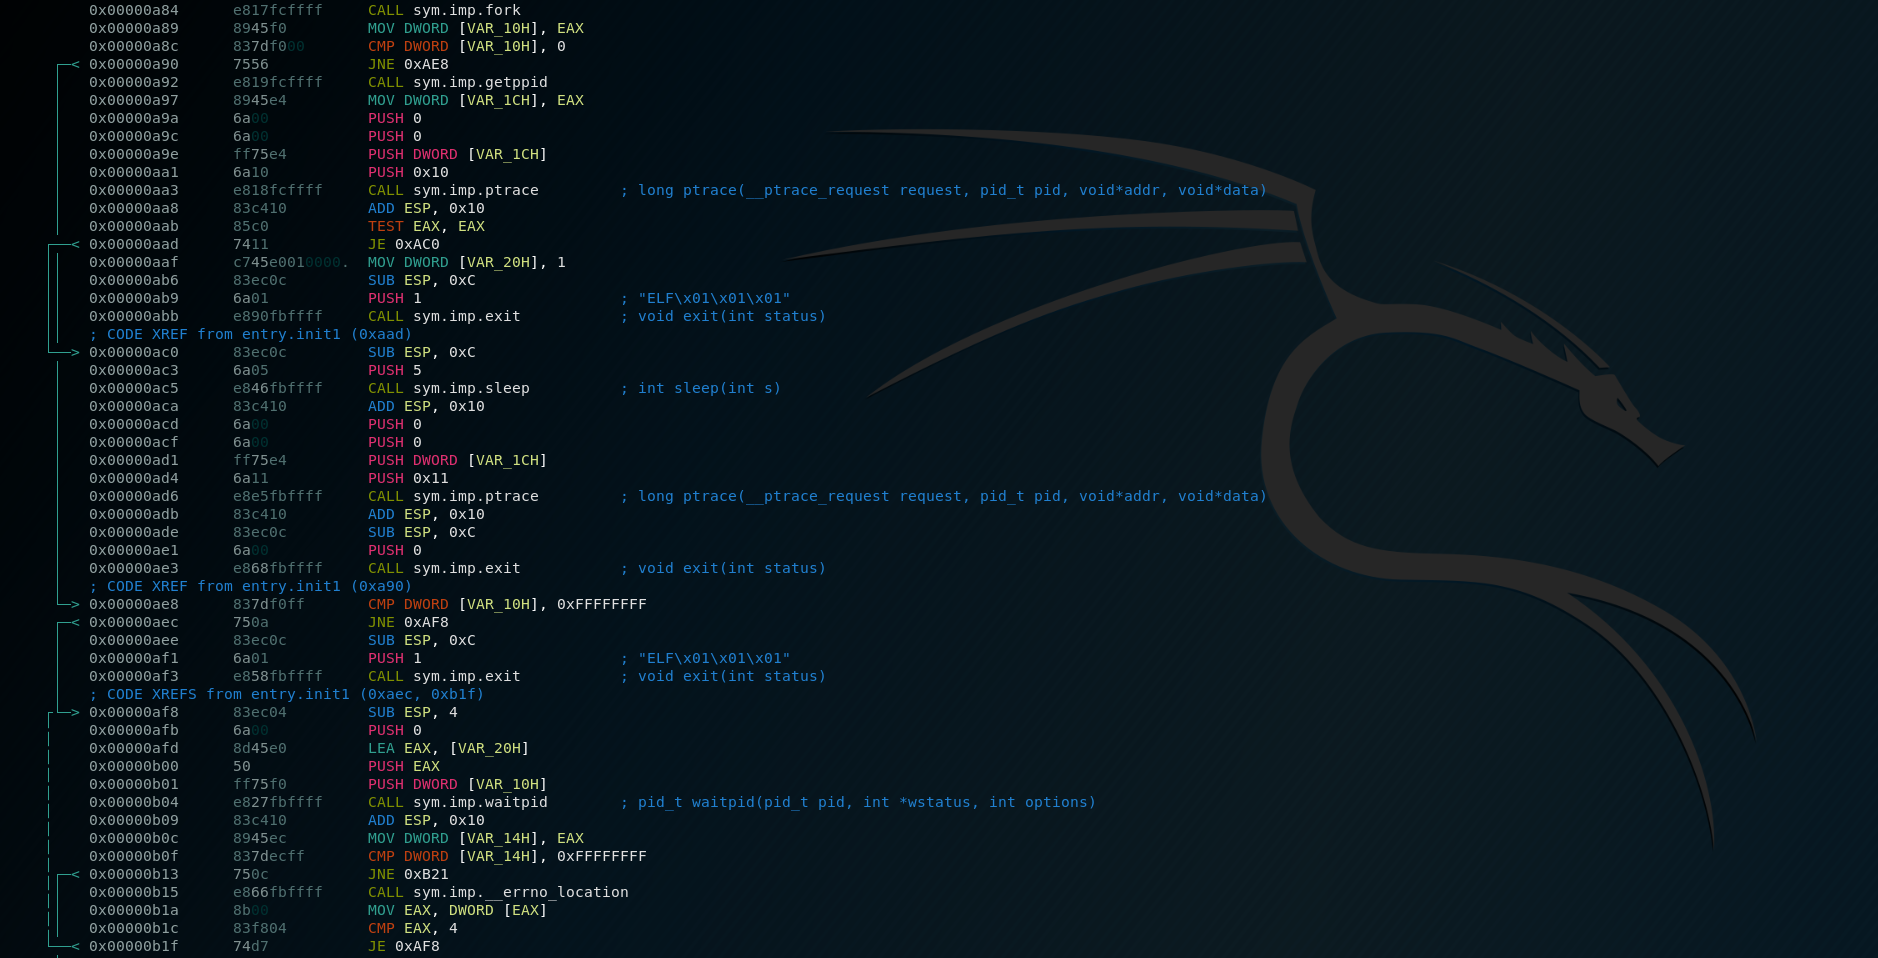
Great, after a few couples of runs, we know that there are some anti-VM and anti-debug code in place. Let's look inside.
First thing, I searched and found the strings pretty quickly, and I noticed also two other interesting strings: one for a fail, one for a success.

Digging a little more, we can find where are placed the strings and from where they're used for.

It's clear that the subroutine placed at address 0x566429DC has something to do with them and with the anti-VM/anti-debug tricks.
Analyzing the anti-debug and anti-vm routine
Once I have identified where are the strings involved in this anti-debug and anti-vm tricks, it's easy to find them and visualize the blocks in IDA. Please note that sub_566429DC was here renamed in AntiDebugAntiVM.
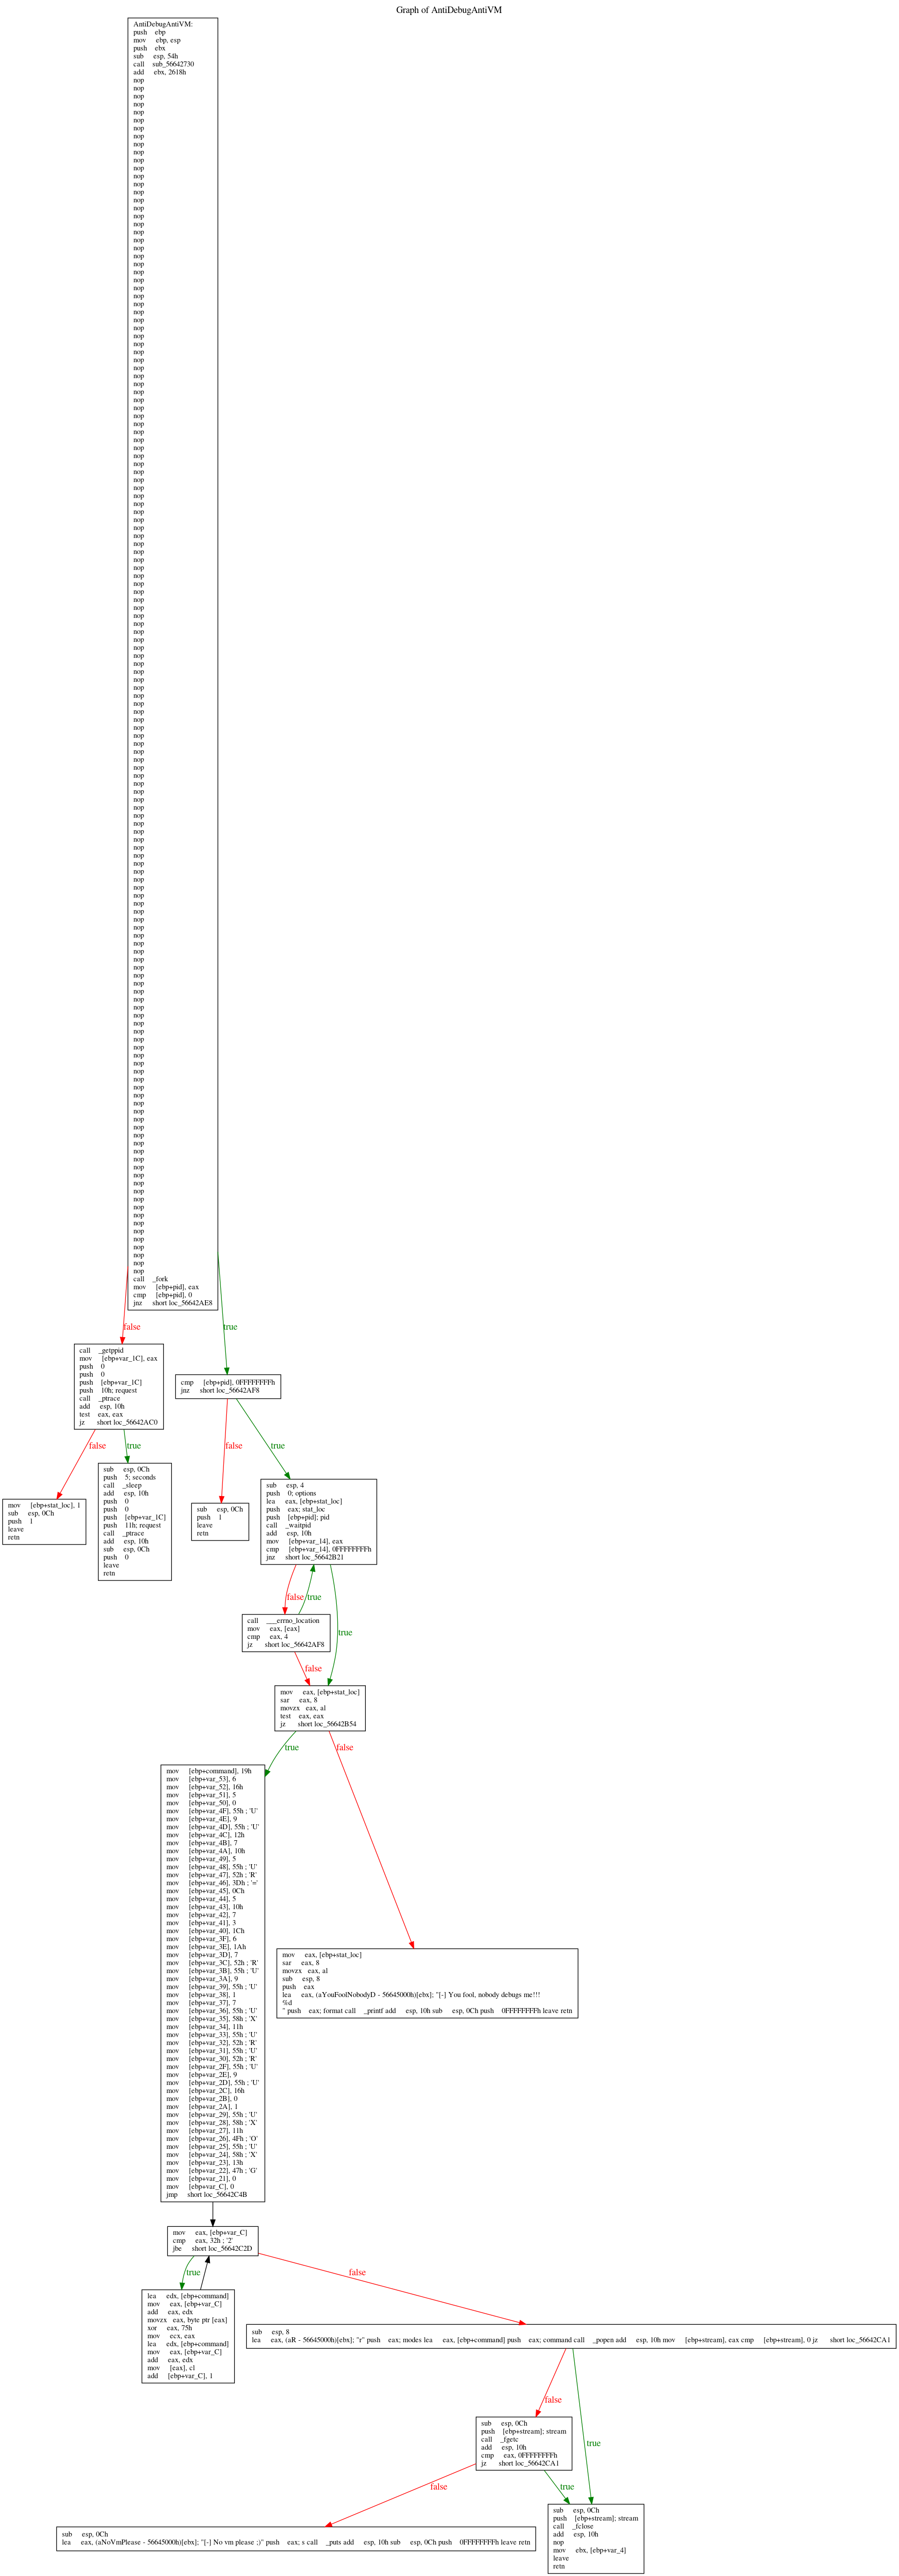
This is the graph of the AntiDebugAntiVM functions. In the first block of code, we can see the standard function call convention that setup the stack frame. After that, a bunch of NOPS and a call to fork(). Let's understand the fork call, what's its purpose?
fork() creates a new process by duplicating the calling process. The new process, referred to as the child, is an exact duplicate of the calling process, referred to as the parent. On success, the PID of the child process is returned in the parent, and 0 is returned in the child. On failure, -1 is returned in the parent, no child process is created, and errno is set appropriately. (ref)
Basically, right after the fork call, its return value is saved into the EAX register and then moved into a local variable that is compared with the zero value. The first branch is important: if the JNZ is true, we're into the parent process so we're going into the right path. Vice versa, if the instruction is false we're heading to the left or into the child process.
Into the child process
If EAX is zero, or in other terms, we're into the child process, we can see a call to getppid()function that returns the process ID of the parent of the calling process. But the important call is the next one, the call to the ptrace() function. The standard definition of this function is:
The ptrace() system call provides a means by which one process (the"tracer") may observe and control the execution of another process(the "tracee"), and examine and change the tracee's memory and registers. It is primarily used to implement breakpoint debugging and system call tracing.
And is defined as:
long ptrace(enum __ptrace_request request, pid_t pid, void *addr, void *data);
In assembly, the call is built with these lines of code:
push    0             ; *data
push    0             ; *addr
push    [ebp+var_1C]  ; Parent PID
push    10h           ; _ptrace_request
call    _ptrace
Basically, the child retrieve its PPID and tries to attach a debugger [1], if it fails, it's the evidence that it is being debugged so sleep 5 seconds, detach and returns [2] . Otherwise returns anyway [3]. Going up a level, if the fork() return -1 so returns with the status code 1 [5]
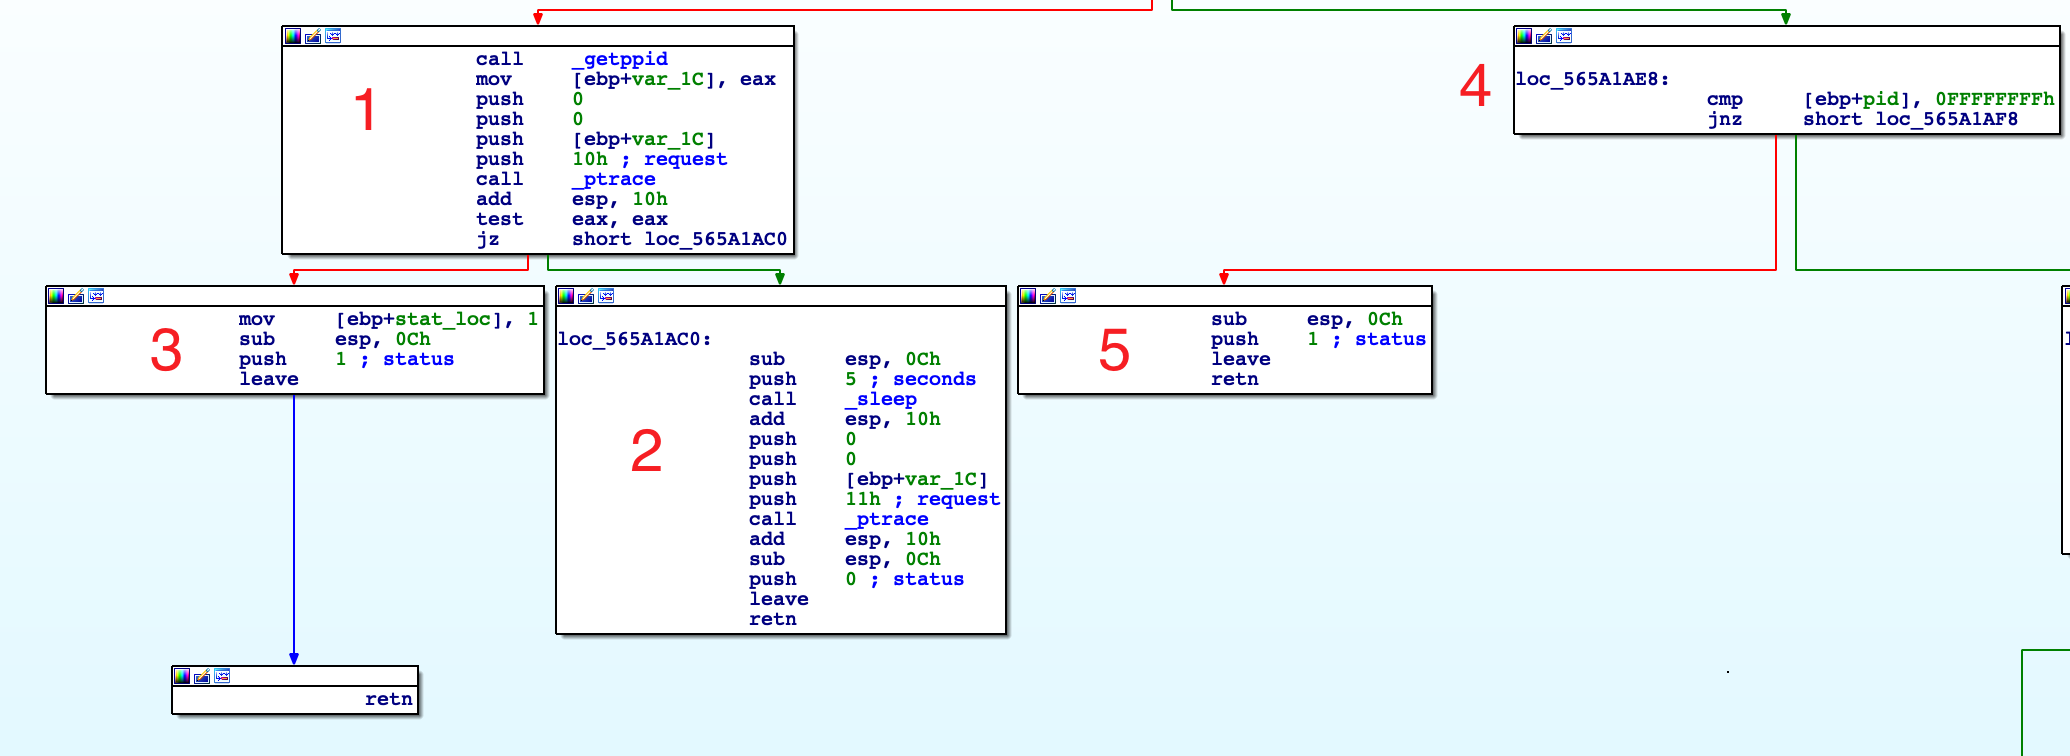
Into the parent process
If EAX is not zero, we're in the right path, so in the parent process. As you can remember, we have the PID of the child into the EAX register. After the check with -1 into the block [1], it goes into the block [2]. Here, the parent performs a call to waitpid():
push    0                     ; options
lea     eax, [ebp+stat_loc]
push    eax                   ; stat_loc
push    [ebp+pid]             ; child PID
call    _waitpid
The waitpid() system call is used to wait for state changes in a child of the calling process, and obtain information about the child whose state has changed. A state change is considered to be: the child terminated; the child was stopped by a signal; or the child was resumed by a signal. In the case of a terminated child, performing a wait allows the system to release the resources associated with the child; if a wait is not performed, then the terminated child remains in a "zombie" state. (ref)
On success, waitpid() returns the process ID of the child whose state has changed; On error, -1 is returned. In the next blocks 2, 3, 4 and 5 what happens is described in this answer I got on ReverseEngineering. There's no need to add anything more.
Anti-VM code
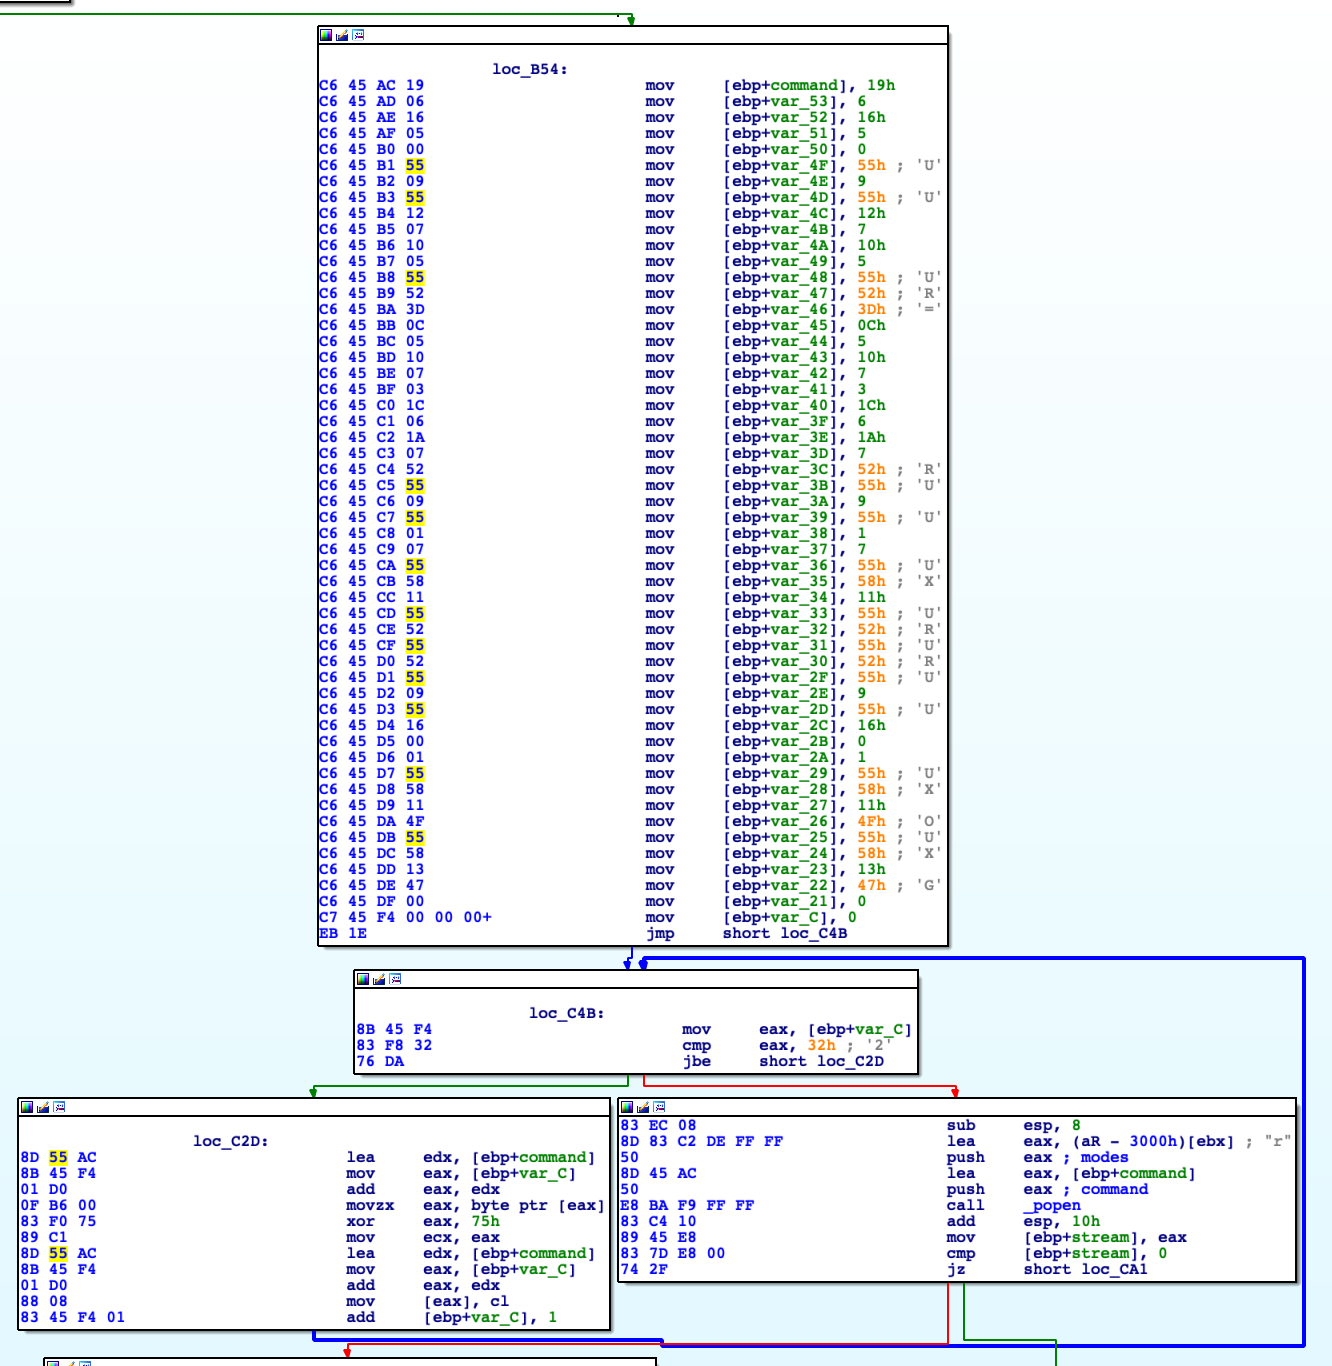
This is where things become fun and interesting. We can observe a bunch of mov instructions into the stack, a loop and inside of it an interesting xor instruction: xor eax, 75h. It seems to be a loop that cycle 0x32 times (50in decimal) and starting from [ebp+command] it xors one byte at a time to a fixed value equal to \x75. Pretty standard XOR decryption routine, right? We can try to replicate this routine in python:
#!/usr/bin/python

hexdata = "19061605005509551207100555523D0C051007031C061A07525509550107555811555255525509551600015558114F55581347"
binary = hexdata.decode("hex")

def xor_strings(data):
    return "".join(chr(ord(data[i]) ^ 0x75) for i in range(len(data)))

xored = xor_strings(binary)
print "Your decrypted string is: " + xored
root@kali:/opt/ctf# ./script.py
Your decrypted string is: lscpu | grep 'Hypervisor' | tr -d ' ' | cut -d: -f2
Basically, it decrypts in memory a shell command and execute it via the next popen syscall that verifies, using the lscpu command, if the CPU name contains a string Hypervisor. This syscall looks pretty interesting:
Thepopen()function opens a process by creating a pipe, forking, and invoking the shell. Since a pipe is by definition unidirectional, the type argument may specify only reading or writing, not both; the resulting stream is correspondingly read-only or write-only. The command argument is a pointer to a null-terminated string containing a shell command line. This command is passed to /bin/sh using the -c flag; interpretation, if any, is performed by the shell. The type argument is a pointer to a null-terminated string which must contain either the letter 'r' for reading or the letter 'w' for writing.popen(): on success, returns a pointer to an open stream that can be used to read or write to the pipe; if the fork(2) or pipe(2) calls fail, or if the function cannot allocate memory,NULLis returned.
After the stream is opened, another syscall fgetc() is executed.
fgetc() reads the next character from stream and returns it as an unsigned char cast to an int, or EOF on end of file or error.What happens is simple: it opens a stream, in read-only mode, and executes the command 'lscpu | grep 'Hypervisor' | tr -d ' ' | cut -d: -f2' . If it returns something, so the grep returns something, we're in a virtual machine, prints the string: [-] No vm please ;) and exit. If the stream fails or it does not return anything, it closes the stream via the fclose() syscall and returns.
Everything becomes clear if we look now into the pseudo-code, with important variables renamed as their role.
int AntiDebugAntiVM()
{
  char command; // [esp+4h] [ebp-54h]
  char v2; // [esp+5h] [ebp-53h]
  char v3; // [esp+6h] [ebp-52h]
  char v4; // [esp+7h] [ebp-51h]
  char v5; // [esp+8h] [ebp-50h]
  char v6; // [esp+9h] [ebp-4Fh]
  char v7; // [esp+Ah] [ebp-4Eh]
  char v8; // [esp+Bh] [ebp-4Dh]
  char v9; // [esp+Ch] [ebp-4Ch]
  char v10; // [esp+Dh] [ebp-4Bh]
  char v11; // [esp+Eh] [ebp-4Ah]
  char v12; // [esp+Fh] [ebp-49h]
  char v13; // [esp+10h] [ebp-48h]
  char v14; // [esp+11h] [ebp-47h]
  char v15; // [esp+12h] [ebp-46h]
  char v16; // [esp+13h] [ebp-45h]
  char v17; // [esp+14h] [ebp-44h]
  char v18; // [esp+15h] [ebp-43h]
  char v19; // [esp+16h] [ebp-42h]
  char v20; // [esp+17h] [ebp-41h]
  char v21; // [esp+18h] [ebp-40h]
  char v22; // [esp+19h] [ebp-3Fh]
  char v23; // [esp+1Ah] [ebp-3Eh]
  char v24; // [esp+1Bh] [ebp-3Dh]
  char v25; // [esp+1Ch] [ebp-3Ch]
  char v26; // [esp+1Dh] [ebp-3Bh]
  char v27; // [esp+1Eh] [ebp-3Ah]
  char v28; // [esp+1Fh] [ebp-39h]
  char v29; // [esp+20h] [ebp-38h]
  char v30; // [esp+21h] [ebp-37h]
  char v31; // [esp+22h] [ebp-36h]
  char v32; // [esp+23h] [ebp-35h]
  char v33; // [esp+24h] [ebp-34h]
  char v34; // [esp+25h] [ebp-33h]
  char v35; // [esp+26h] [ebp-32h]
  char v36; // [esp+27h] [ebp-31h]
  char v37; // [esp+28h] [ebp-30h]
  char v38; // [esp+29h] [ebp-2Fh]
  char v39; // [esp+2Ah] [ebp-2Eh]
  char v40; // [esp+2Bh] [ebp-2Dh]
  char v41; // [esp+2Ch] [ebp-2Ch]
  char v42; // [esp+2Dh] [ebp-2Bh]
  char v43; // [esp+2Eh] [ebp-2Ah]
  char v44; // [esp+2Fh] [ebp-29h]
  char v45; // [esp+30h] [ebp-28h]
  char v46; // [esp+31h] [ebp-27h]
  char v47; // [esp+32h] [ebp-26h]
  char v48; // [esp+33h] [ebp-25h]
  char v49; // [esp+34h] [ebp-24h]
  char v50; // [esp+35h] [ebp-23h]
  char v51; // [esp+36h] [ebp-22h]
  char v52; // [esp+37h] [ebp-21h]
  int stat_loc; // [esp+38h] [ebp-20h]
  __pid_t ParentPID; // [esp+3Ch] [ebp-1Ch]
  FILE *stream; // [esp+40h] [ebp-18h]
  __pid_t ChangedStateChildPID; // [esp+44h] [ebp-14h]
  __pid_t ChildPID; // [esp+48h] [ebp-10h]
  unsigned int i; // [esp+4Ch] [ebp-Ch]

  ChildPID = fork();
  if ( !ChildPID )
  {
    ParentPID = getppid();
    if ( ptrace(PTRACE_ATTACH, ParentPID, 0, 0) )
    {
      stat_loc = 1;
      exit(1);
    }
    sleep(5u);
    ptrace(PTRACE_DETACH, ParentPID, 0, 0);
    exit(0);
  }
  if ( ChildPID == -1 )
    exit(1);
  do
    ChangedStateChildPID = waitpid(ChildPID, &stat_loc, 0);
  while ( ChangedStateChildPID == -1 && *__errno_location() == 4 );
  if ( BYTE1(stat_loc) )
  {
    printf("[-] You fool, nobody debugs me!!!\n%d\n", BYTE1(stat_loc));
    exit(-1);
  }
  command = 0x19;
  v2 = 6;
  v3 = 0x16;
  v4 = 5;
  v5 = 0;
  v6 = 0x55;
  v7 = 9;
  v8 = 0x55;
  v9 = 0x12;
  v10 = 7;
  v11 = 0x10;
  v12 = 5;
  v13 = 0x55;
  v14 = 0x52;
  v15 = 0x3D;
  v16 = 0xC;
  v17 = 5;
  v18 = 0x10;
  v19 = 7;
  v20 = 3;
  v21 = 0x1C;
  v22 = 6;
  v23 = 0x1A;
  v24 = 7;
  v25 = 0x52;
  v26 = 0x55;
  v27 = 9;
  v28 = 0x55;
  v29 = 1;
  v30 = 7;
  v31 = 0x55;
  v32 = 0x58;
  v33 = 0x11;
  v34 = 0x55;
  v35 = 0x52;
  v36 = 0x55;
  v37 = 0x52;
  v38 = 0x55;
  v39 = 9;
  v40 = 0x55;
  v41 = 0x16;
  v42 = 0;
  v43 = 1;
  v44 = 0x55;
  v45 = 0x58;
  v46 = 0x11;
  v47 = 0x4F;
  v48 = 0x55;
  v49 = 0x58;
  v50 = 0x13;
  v51 = 0x47;
  v52 = 0;
  for ( i = 0; i <= 50; ++i )
    *(&command + i) ^= 0x75u;
  stream = popen(&command, "r");
  if ( stream && fgetc(stream) != -1 )
  {
    puts("[-] No vm please ;)");
    exit(-1);
  }
  return fclose(stream);
}
First round of conclusions
Right now it may seem pretty easy, but for me at that time, this was impossible to understand and represented the first big fail: I was not prepared with interpreting assembly XOR instruction, decryption loops and Linux syscalls. I spent almost an entire weekend on this and failed so hard. Because of the time constraints of the job selection, I sent my results without this last exercise and maybe this influenced my performance into the selection. How to bypass all these checks? We need to find from where this function is called and maybe we could modify the code flow to avoid this calling.
Jumping away
With the IDA basic functionalities, we can find where this function is called and, luckily for us, it's called from a single location:
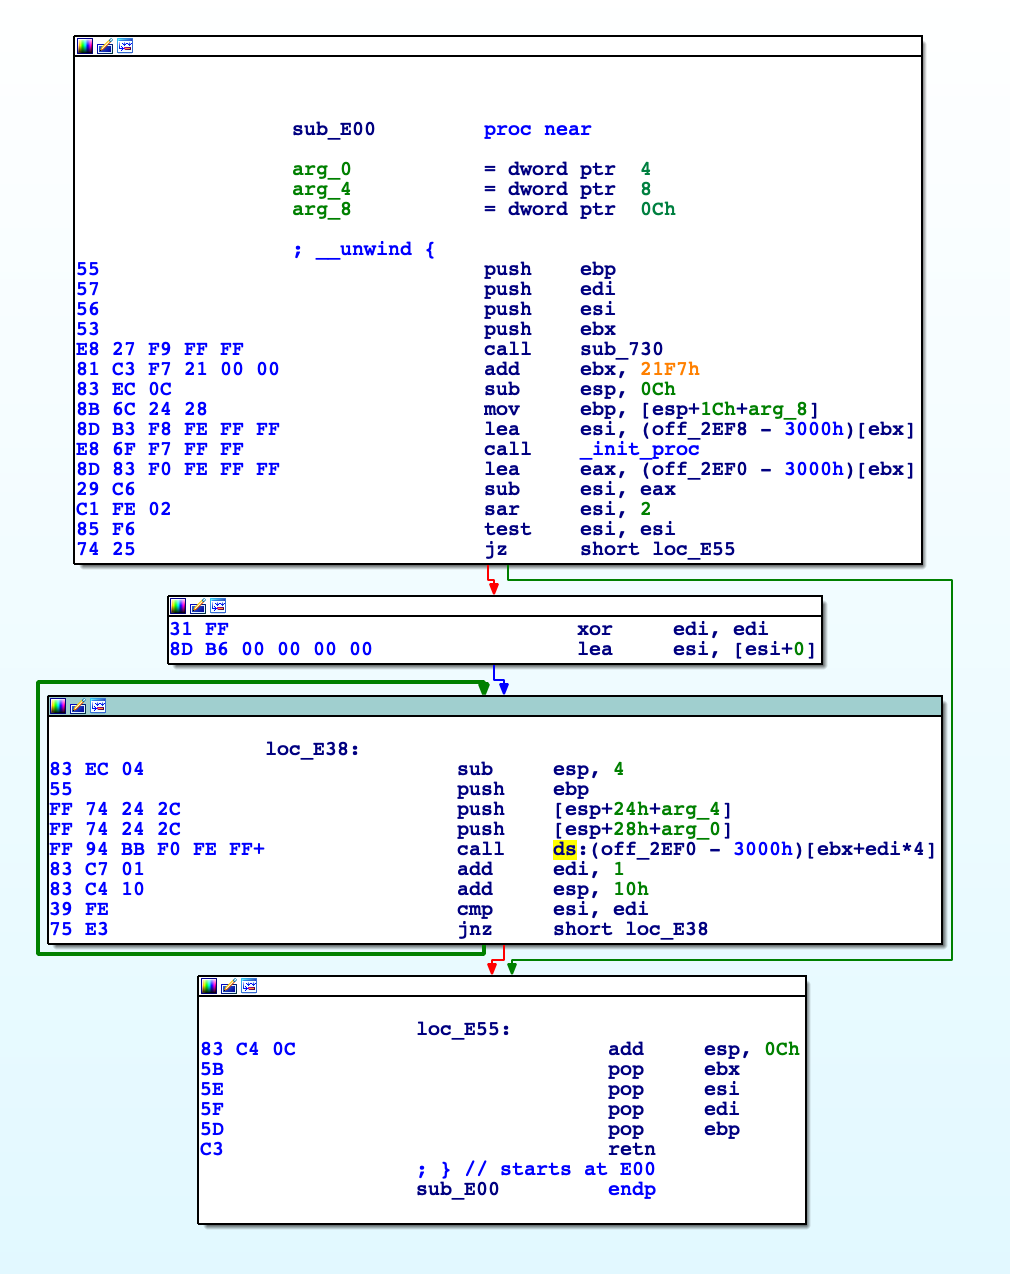
The instruction that calls the function is located inside this sub_E00 and, in particular, IDA shows that's the instruction: call ds:(off_2EF0-3000h) [ebx+edi*4]. Looking around this code we can patch the jz short loc_E55 into a jmp, so we would be able to circumvent all of the above protections.
Cheating with the shell
If you don't want to patch the binary, there's another way to fool this VM check, but not the anti-debug. If you notice, the command passed as an argument to the popen syscall is a normal shell command but with a relative path. So quick and dirty trick would be to create a fake lscpu like this:
#!/bin/bash
echo "I will run you anyway in this VM"
Be sure to export the directory inside the PATH variable and, basically, you're done: when the binary will try to execute the lscpu command, it will run the fake one, it won't return anything containing Hypervisor string, the grep would return nothing and the fgetc consequently will read nothing. Basically, all checks are positive. Easy as it seems.
Analyzing the self decrypting and injecting routine
We can take advantages of the debugging capabilities of IDA and playing with breakpoints. Single stepping into the program flow, after the above routines, we land into this interesting piece of code:
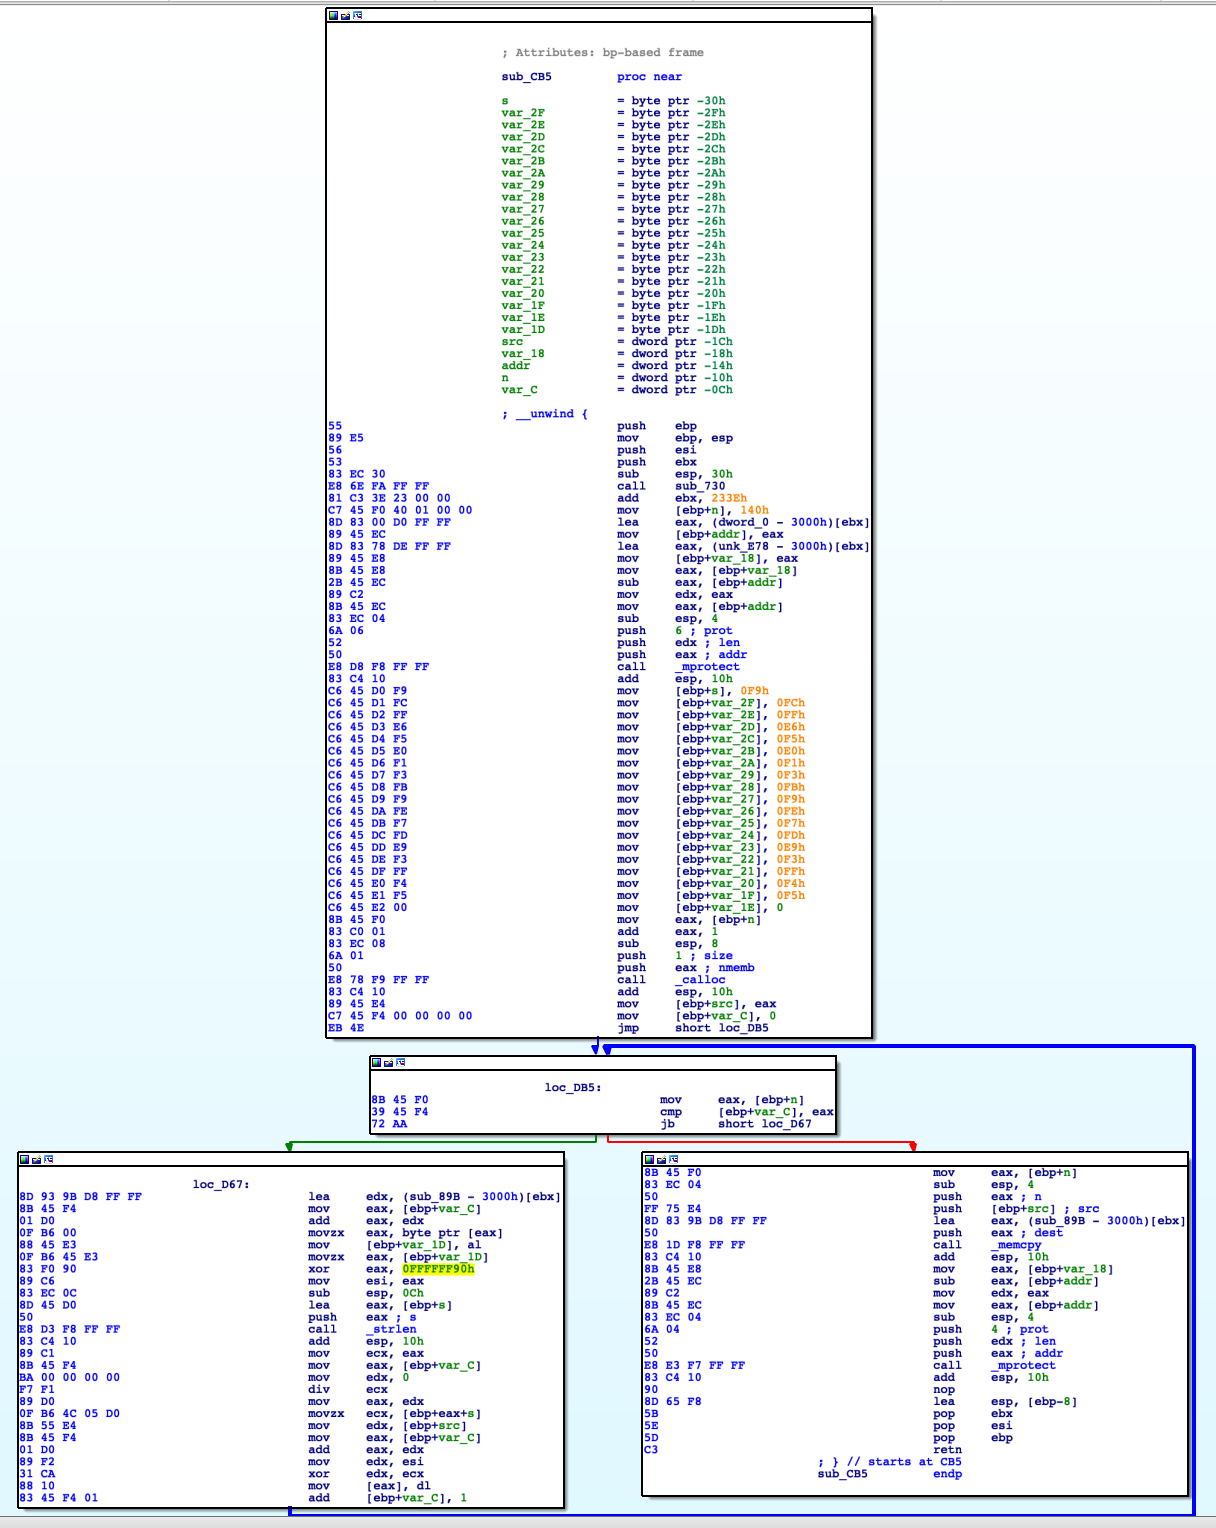
I spent a lot of days trying to understand this routine: but it was worth it because I learned a lot: I learned about linux syscalls like mprotect, calloc and also memcpy. I learned about how the code could auto-decrypt and auto-inject inside the binary itself. Moreover, how can be possible to change memory protections back and forth. Indeed, it was very helpful to look around this code, side by side, with its decompiled version:
int sub_CB5()
{
  char v0; // si
  size_t v1; // eax
  char s; // [esp+8h] [ebp-30h]
  char v4; // [esp+9h] [ebp-2Fh]
  char v5; // [esp+Ah] [ebp-2Eh]
  char v6; // [esp+Bh] [ebp-2Dh]
  char v7; // [esp+Ch] [ebp-2Ch]
  char v8; // [esp+Dh] [ebp-2Bh]
  char v9; // [esp+Eh] [ebp-2Ah]
  char v10; // [esp+Fh] [ebp-29h]
  char v11; // [esp+10h] [ebp-28h]
  char v12; // [esp+11h] [ebp-27h]
  char v13; // [esp+12h] [ebp-26h]
  char v14; // [esp+13h] [ebp-25h]
  char v15; // [esp+14h] [ebp-24h]
  char v16; // [esp+15h] [ebp-23h]
  char v17; // [esp+16h] [ebp-22h]
  char v18; // [esp+17h] [ebp-21h]
  char v19; // [esp+18h] [ebp-20h]
  char v20; // [esp+19h] [ebp-1Fh]
  char v21; // [esp+1Ah] [ebp-1Eh]
  char v22; // [esp+1Bh] [ebp-1Dh]
  void *src; // [esp+1Ch] [ebp-1Ch]
  _BYTE *v24; // [esp+20h] [ebp-18h]
  void *addr; // [esp+24h] [ebp-14h]
  size_t n; // [esp+28h] [ebp-10h]
  size_t i; // [esp+2Ch] [ebp-Ch]

  n = 320;
  addr = 0;
  v24 = &unk_E78;
  mprotect(0, (size_t)((char *)&unk_E78 - 0xFFFFD000 - 12288), 6);
  s = 0xF9u;
  v4 = 0xFCu;
  v5 = 0xFFu;
  v6 = 0xE6u;
  v7 = 0xF5u;
  v8 = 0xE0u;
  v9 = 0xF1u;
  v10 = 0xF3u;
  v11 = 0xFBu;
  v12 = 0xF9u;
  v13 = 0xFEu;
  v14 = 0xF7u;
  v15 = 0xFDu;
  v16 = 0xE9u;
  v17 = 0xF3u;
  v18 = 0xFFu;
  v19 = 0xF4u;
  v20 = 0xF5u;
  v21 = 0;
  src = calloc(0x141u, 1u);
  for ( i = 0; i < n; ++i )
  {
    v22 = *((_BYTE *)sub_89B + i);
    v0 = v22 ^ 0x90;
    v1 = strlen(&s);
    *((_BYTE *)src + i) = *(&s + i % v1) ^ v0;
  }
  memcpy(sub_89B, src, n);
  return mprotect(addr, v24 - (_BYTE *)addr, 4);
}
TL;DR
Before we go deep into the details of the single blocks of code, giving a general overview of what its final purpose is, may help its comprehension. First thing, the code changes via mprotect function the memory protections, adding the write permission, of a specific part of its .text section. After that, it copies, into the stack, some bytes that will be revealed as a key for an afterward decryption. Before entering into the main loop, it allocates an array of bytes into the heap via calloc. Specifically, the length of the array is 0x140 bytes; this value is saved into a local variable placed into the stack at [ebp+n] offset. The main loop is somehow complicated because it xors byte per byte some of its code, placed at sub_89B+i offset, with a fixed constant 0x90 and after, it xors it again with the aforementioned key on the stack. After that, it overwrites the code placed at sub_89B offset, with these new values via the memcpy call and returns after changing again the memory protections of that code section back to read-execute. Let's break in line by line, considering only the useful ones.
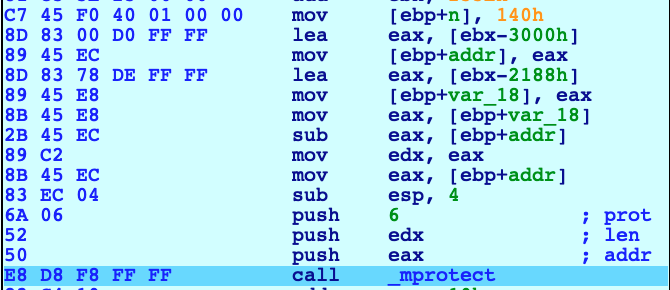
Here, it setups the length of the future array in the variable placed on the stack at [ebp+n] with the size of 0x140 or 320 elements of 1 byte. After that, it prepares the arguments of the next call to mprotect, that will change the protection, enabling write permission, on the the address 0x5657D000. Looking up the stack:

Having ESP pointing at 0xFFC344F0, the calling convention dictate that the arguments of a function must be pushed into the stack in reverse order. The mprotect call is defined as: int mprotect(void *addr, size_t len, int prot); with
prot=6len=0xE78*addr=0x5657D000
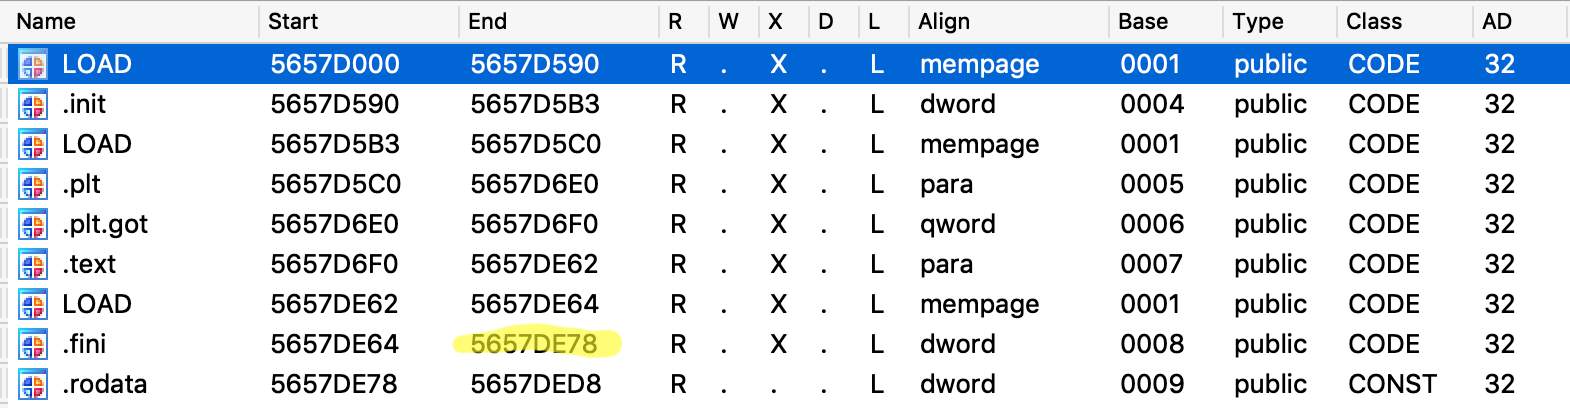
In other words: change the permission of the memory area of 3704 bytes starting from address 0x5657D000, granting the writability via the PROT_WRITE constant. More info of this syscall here. But what's inside this address? We're inside the ELF header, basically the start of the entire binary.
Going further, we can see the moving into the stack of some bytes, a call to calloc to allocate an array of 320+1 null bytes into the heap and the setup of a loop counter variable, placed at [ebp+var_C], with the same size of the array. We're setting up a loop that will scan, byte per byte, a specific area of the binary located at 0x5657D89B - that is a fixed value - and xor every byte, first with 0x90 and after with those bytes that were moved into the stack. For better understand this loop, I suggest to read the answer I got here. When this decryption loop ends, we have the decrypted code inside the heap, into the allocated array. Code can now be replaced with the decrypted one via the memcpy syscall. Finally, write permission can now be disabled and the routine can finish and return.
Second round of conclusions
Many days and months passed staring at me failing so hard into the understanding of this routine. But the feeling was still the same: I wanted to have that "[+] Good job! ;)" string and I've always had the Try Harder approach. Understanding this loop wasn't easy, not even close. I asked for help and, luckily, I got plenty. This is what I got: don't be afraid to ask for help but don't blindly ask for a solution. Work on that, demonstrate that you studied that thing and failed; People, eventually, will get that and will help you.
Towards the victory
After executing the decryption function we land into the code below. First it verifies that the user submitted a password of the length of exactly 0x27, that is a fixed value coming from this instruction: mov eax, (dword_56561058 - 56561000h) [ebx].
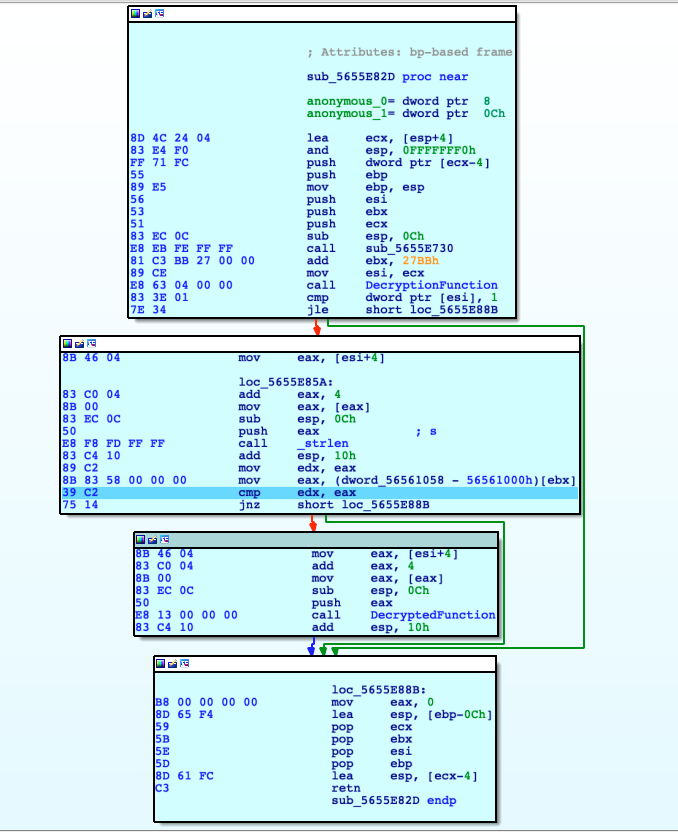
Only if the password is exactly 39 characters, it moves on into the DecryptedFunction, passing the user's password as the argument. The previous experience helped a lot to understand this function and the pseudo code generated by IDA is pretty nice.
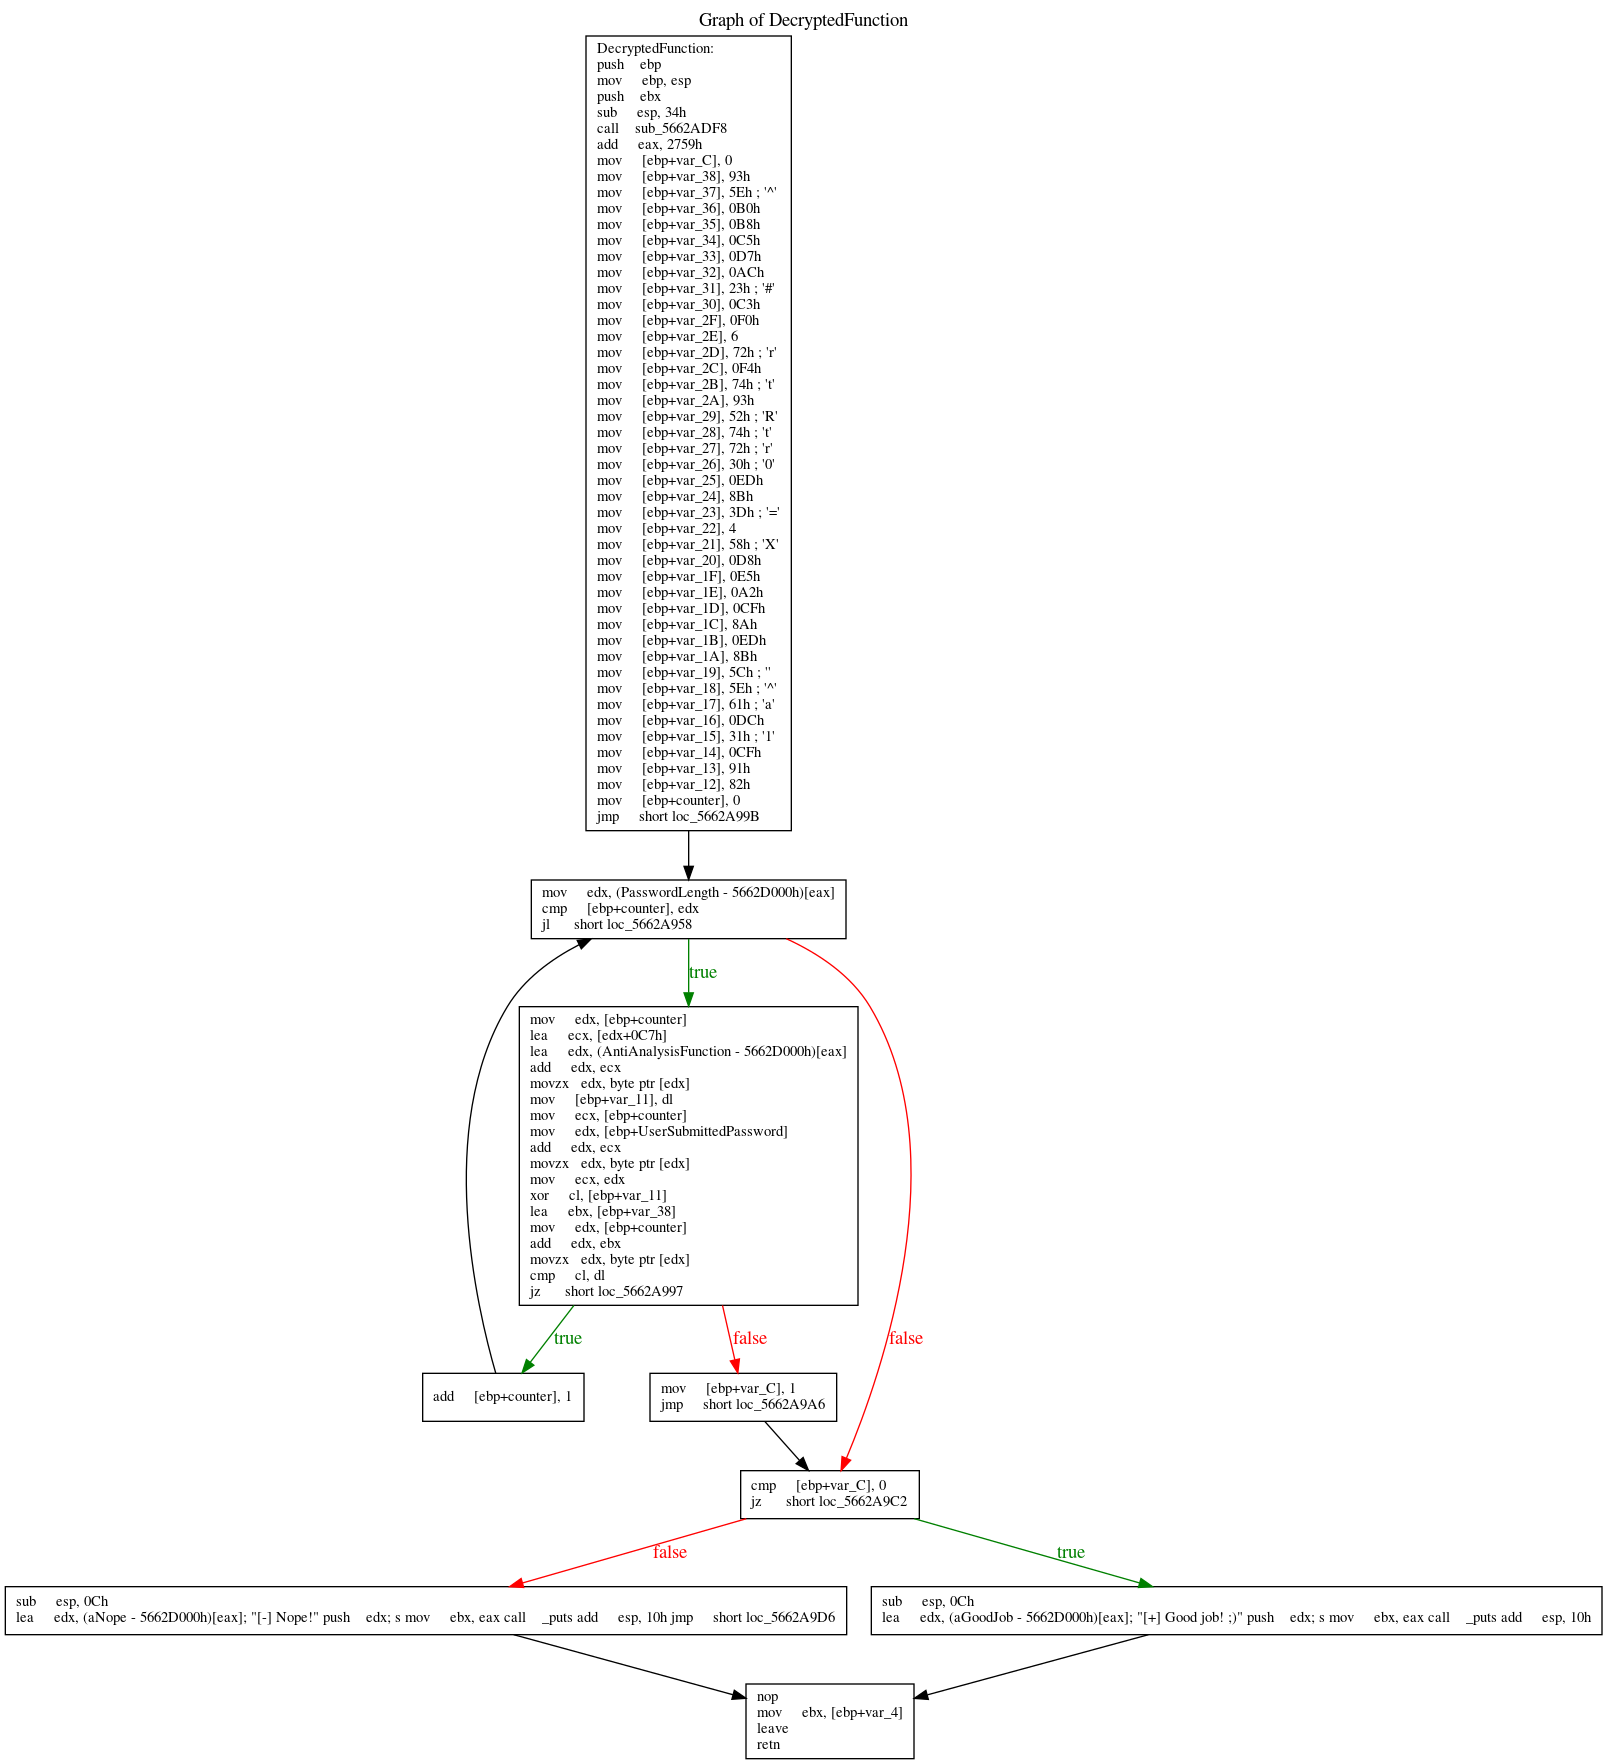
int __cdecl DecryptedFunction(int UserSubmittedPassword)
{
  int result; // eax
  char v2; // [esp+0h] [ebp-38h]
  char v3; // [esp+1h] [ebp-37h]
  char v4; // [esp+2h] [ebp-36h]
  char v5; // [esp+3h] [ebp-35h]
  char v6; // [esp+4h] [ebp-34h]
  char v7; // [esp+5h] [ebp-33h]
  char v8; // [esp+6h] [ebp-32h]
  char v9; // [esp+7h] [ebp-31h]
  char v10; // [esp+8h] [ebp-30h]
  char v11; // [esp+9h] [ebp-2Fh]
  char v12; // [esp+Ah] [ebp-2Eh]
  char v13; // [esp+Bh] [ebp-2Dh]
  char v14; // [esp+Ch] [ebp-2Ch]
  char v15; // [esp+Dh] [ebp-2Bh]
  char v16; // [esp+Eh] [ebp-2Ah]
  char v17; // [esp+Fh] [ebp-29h]
  char v18; // [esp+10h] [ebp-28h]
  char v19; // [esp+11h] [ebp-27h]
  char v20; // [esp+12h] [ebp-26h]
  char v21; // [esp+13h] [ebp-25h]
  char v22; // [esp+14h] [ebp-24h]
  char v23; // [esp+15h] [ebp-23h]
  char v24; // [esp+16h] [ebp-22h]
  char v25; // [esp+17h] [ebp-21h]
  char v26; // [esp+18h] [ebp-20h]
  char v27; // [esp+19h] [ebp-1Fh]
  char v28; // [esp+1Ah] [ebp-1Eh]
  char v29; // [esp+1Bh] [ebp-1Dh]
  char v30; // [esp+1Ch] [ebp-1Ch]
  char v31; // [esp+1Dh] [ebp-1Bh]
  char v32; // [esp+1Eh] [ebp-1Ah]
  char v33; // [esp+1Fh] [ebp-19h]
  char v34; // [esp+20h] [ebp-18h]
  char v35; // [esp+21h] [ebp-17h]
  char v36; // [esp+22h] [ebp-16h]
  char v37; // [esp+23h] [ebp-15h]
  char v38; // [esp+24h] [ebp-14h]
  char v39; // [esp+25h] [ebp-13h]
  char v40; // [esp+26h] [ebp-12h]
  unsigned __int8 v41; // [esp+27h] [ebp-11h]
  int counter; // [esp+28h] [ebp-10h]
  int v43; // [esp+2Ch] [ebp-Ch]

  v43 = 0;
  v2 = 0x93u;
  v3 = 0x5E;
  v4 = 0xB0u;
  v5 = 0xB8u;
  v6 = 0xC5u;
  v7 = 0xD7u;
  v8 = 0xACu;
  v9 = 0x23;
  v10 = 0xC3u;
  v11 = 0xF0u;
  v12 = 6;
  v13 = 0x72;
  v14 = 0xF4u;
  v15 = 0x74;
  v16 = 0x93u;
  v17 = 0x52;
  v18 = 0x74;
  v19 = 0x72;
  v20 = 0x30;
  v21 = 0xEDu;
  v22 = 0x8Bu;
  v23 = 0x3D;
  v24 = 4;
  v25 = 0x58;
  v26 = 0xD8u;
  v27 = 0xE5u;
  v28 = 0xA2u;
  v29 = 0xCFu;
  v30 = 0x8Au;
  v31 = 0xEDu;
  v32 = 0x8Bu;
  v33 = 0x5C;
  v34 = 0x5E;
  v35 = 0x61;
  v36 = 0xDCu;
  v37 = 0x31;
  v38 = 0xCFu;
  v39 = 0x91u;
  v40 = 0x82u;
  for ( counter = 0; counter < PasswordLength; ++counter )
  {
    v41 = *((_BYTE *)AntiAnalysisFunction + counter + 0xC7);
    if ( (v41 ^ *(_BYTE *)(counter + UserSubmittedPassword)) != *(&v2 + counter) )
    {
      v43 = 1;
      break;
    }
  }
  if ( v43 )
    result = puts("[-] Nope!");
  else
    result = puts("[+] Good job! ;)");
  return result;
}
It scans the user's password, character by character, xoring it with a string retrieved from the binary itself. If every character matches it goes on and continue in the loop, otherwise it breaks. In the end, if everything is correct, it prints the beloved success string. How can we retrieve the correct flag? If we dump the 39 bytes from the binary, from the correct addresses, and xor them with the hardcoded string, we can take advantage of the xor bidirectional nature. Although you can find more details here, we're basically telling this:
A xor B = C
A xor C = B
B xor C = A
My first approach was to bruteforce the routine: if the string submitted is, eventually, \x41\x41\x41\x41\x41\x41\x41... we can step by step into the code and go into the final cmp instruction, retrieve the byte that it compares to and change the ZERO flag to force the loop to continue and not to stop. Otherwise we can dump the contents of the memory and xor with the hardcoded string, as result we get the flag that needs to be submitted to the binary.
We know that we need to get 39 bytes from address *((_BYTE *)AntiAnalysisFunction + 0 + 0xC7) to *((_BYTE *)AntiAnalysisFunction + 0x27 + 0xC7). Or from (0x5662A9DC + 0 + 0xC7) = 0x5662AAA3 to 0x5662AACA = (0x5662A9DC + 0x27 + 0xC7). We can apply the xor operation with the known string and we're able retrieve the flag, finally.
Hardcoded: 93 5E B0 B8 C5 D7 AC 23 C3 F0 06 72 F4 74 93 52 74 72 30 ED 8B 3D 04 58 D8 E5 A2 CF 8A ED 8B 5C 5E 61 DC 31 CF 91 82

Memory dump: E8 18 FC FF FF 83 C4 10 85 C0 74 11 C7 45 E0 01 00 00 00 83 EC 0C 6A 01 E8 90 FB FF FF 83 EC 0C 6A 05 E8 46 FB FF FF

Flag hex: 7B 46 4C 47 3A 54 68 33 46 30 72 63 33 31 73 53 74 72 30 6E 67 31 6E 59 30 75 59 30 75 6E 67 50 34 64 34 77 34 6E 7D
Flag ascii:  {  F  L  G  :  T  h  3  F  0  r  c  3  1  s  S  t  r  0  n  g  1  n  Y  0  u  Y  0  u  n  g  P  4  d  4  w  4  n  }

Conclusions
This was a long journey that required a lot of effort and countless sleepless nights. It was worth it? Every single minute, without any doubt. I hope this post will help you in your studies and if you spot any errors or want to help me in my journey into the reverse engineering world please leave a comment, tweet or e-mail.
As always, Try Harder.